
Joan Plaja
Friday, January 24, 2020
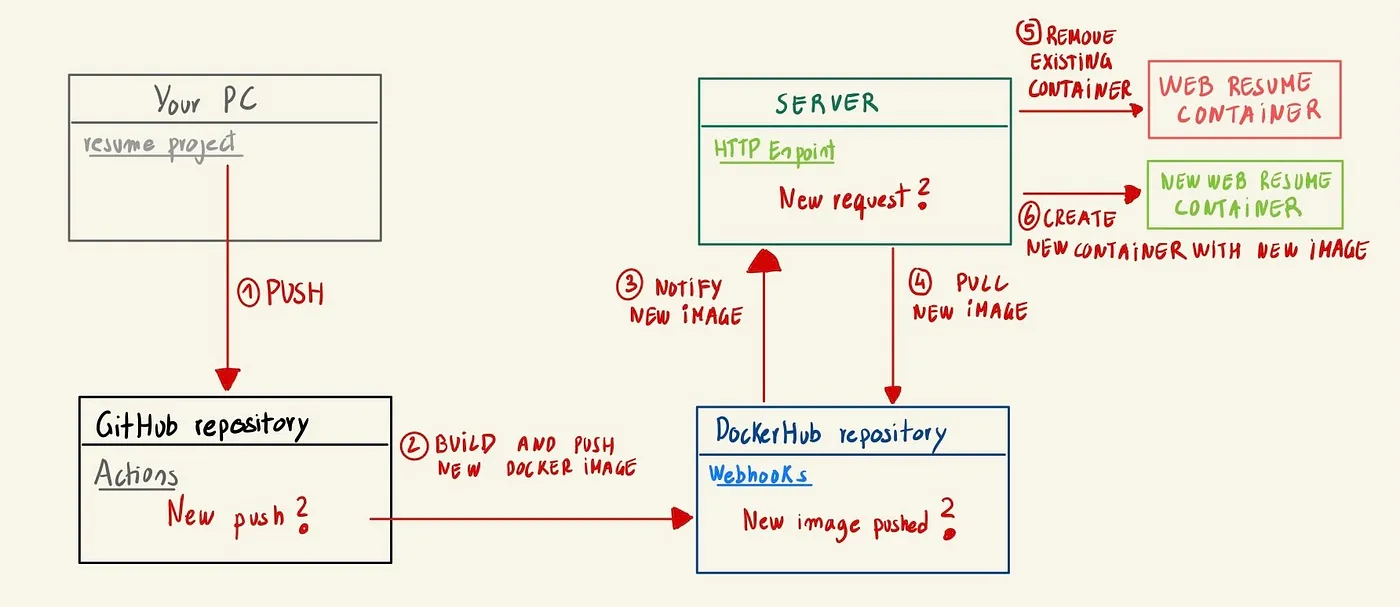
Build your first CI/CD pipeline using Docker, Github Actions, and Webhooks while creating your own web curriculum
In this tutorial, you will learn a basic method for frequently delivering apps to clients by introducing automation into the stages of development known as Continuous Integration/Continuous Delivery.
Firstly, we will use JSON Resume which is an open-source initiative created by the community to create a JSON-based standard for resumes that will assist us in creating a faster launch for our curriculum. This tool creates an HTML resume from a JSON file using a command-line tool.
Next, Github actions will allow us to create a docker image with a basic httpd server that includes the HTML we generated in the previous step, each time our repository is updated. Additionally, this image will be automatically pushed to DockerHub.
As the last step, we will use adnanh/webhook to recreate our container whenever a new image is pushed to our Docker Hub repository. Webhook is a simple, lightweight application written in Go, which allows you to easily create HTTP endpoints on your server, which can be used to execute commands.
It’s just one way of doing it, there are many more. You could build the HTML file with Github Actions instead of copying it after it is built locally and pushed to the repository. It’s just a cool little project to start with since it’s basically only a lab for learning about Docker, Github Actions,…
It’s assumed that most of you have a basic understanding of things like creating a GitHub repository, committing to it, and so on. It is also important that you have docker, npm, and git installed on your computer, which should be enough. Please let me know if you have any problems, and I can either help you or update this article.
Create the resume
The first thing you need to do is create a GitHub repository and clone it locally. Afterward, we can install resume-cli, the JSON Resume command-line tool. To do this, run the following command at the root of your project:
npm install resume-cli
Our next step will be to initialize a new resume:
resume init
Let’s generate our HTML resume now:
npx resume export resume.html
Docker image
Assuming that you have finished the last section, let’s build a docker image that contains the basic Httpd web server with our resume.html created previously. In order to do that, we will make a fairly simple Dockerfile with just two lines. In your project root, create a file named Dockerfile that contains the following lines:
FROM httpd:latest
COPY resume.html /usr/local/apache2/htdocs/index.html
docker build . -t resume-test
docker run -p 80:80 -d --name container-resume resume-test
-d Runs container in background and print container ID and we can still work on the same terminal.
Your curriculum should now appear once you type localhost into your browser. In case it does not, check for any errors on your terminal and repeat the process.
In order to stop and remove the container on your machine, you must run the following commands:
docker container stop container-resume
docker container rm container-resume
Github actions
My favorite section, here you will learn how to use GitHub actions to build our application every time a new commit is made to our repository. Also, after a build is complete, this will upload the image to our Docker Hub repository for us. There’s an awesome document on Docker that shows how to do this, and this is just the easiest part. Take a look at this if you want to find out how to automate more.
To start with, you should go to docker hub and create an account. After that, you will need to name the repository web-resume, or whatever you want to call it. You will need that name on the next steps.
Once the repository has been created, go to Account settings -> Security -> Access Tokens and create a new token. Be sure to save the token, it will be needed later. You can now add the following two secrets in your GitHub repository’s settings: Secrets -> New Secret.
DOCKER_HUB_USERNAME : With your docker hub username.
DOCKER_HUB_ACCESS_TOKEN : With the token previously created.
We are now ready to start writing the cool GitHub actions YAML file. Navigate to the top menu of your repository -> Actions -> New workflow -> Set up a workflow yourself. Copy the text below and paste it:
# This is a basic workflow to help you get started with Actions
name: CI
# Controls when the workflow will run
on:
  # Triggers the workflow on push or pull request events but only for the master branch
  push:
    branches: [ master ]
  pull_request:
    branches: [ master ]
# Allows you to run this workflow manually from the Actions tab
  workflow_dispatch:
# A workflow run is made up of one or more jobs that can run sequentially or in parallel
jobs:
  # This workflow contains a single job called "build"
  build:
    # The type of runner that the job will run on
    runs-on: ubuntu-latest
# Steps represent a sequence of tasks that will be executed as part of the job
    steps:
      # Checks-out your repository under $GITHUB_WORKSPACE, so your job can access it
      - uses: actions/checkout@v2

        name: Login to Docker Hub
      - uses: docker/login-action@v1
        with:
          username: ${{ secrets.DOCKER_HUB_USERNAME }}
          password: ${{ secrets.DOCKER_HUB_ACCESS_TOKEN }}
      -
        name: Set up Docker Buildx
        uses: docker/setup-buildx-action@v1
      -
        name: Build and push
        uses: docker/build-push-action@v2
        with:
          context: .
          file: ./Dockerfile
          push: true
          tags: ${{ secrets.DOCKER_HUB_USERNAME }}/YOUR-DOCKER-HUB-REPO-NAME:latest
The code below was extracted from the documentation I mentioned earlier. It is well documented and easy to follow. Note that the section titled “Set up Docker Buildx” creates our Dockerfile image remotely, just as we did locally. Finally, I also highlighted in bold “YOUR-DOCKER-HUB-REPO-NAME”. If you have named your Docker hub repo differently, and I think so, just be sure to change this name for the one you selected.
Now, whenever you push something to master, a new image will be built and saved to your repository, so go ahead and test it.
Recreate our container
Our project is almost complete, so we need a way to create our container with the last image built on our repository. There is a section on the menu named Webhooks within the Docker Hub repository. This lets you send an HTTPS request each time there is a push event in the repository, along with a bunch of information about it. Hence, the only thing left is to receive requests. For this, I’m going to use adnanh/webhook. We can easily launch an endpoint with it and set it up in a few steps.
A server is needed before you begin the next section. Your own PC can be used, but make sure you have a public IP address so the webhook request can find your computer. I’m using the cheapest and most basic Hertzner Cloud basic server with Ubuntu. Ensure that Docker is installed on your server, as well as being logged into your Docker Account in order to be able to download newly created images. This can be easily done by:
docker login
docker run -p 80:80 -d --name YOUR-CONTAINER-NAME YOUR-DOCKER-HUB-USER/YOUR-DOCKER-HUB-REPO-NAME
#!/bin/sh
# Pull latest version of the image
docker pull YOUR-DOCKER-HUB-USER/YOUR-DOCKER-HUB-REPO-NAME
# Remove unused images
docker image prune -f
# Stop the container
docker stop YOUR-CONTAINER-NAME
# Remove the container
docker rm YOUR-CONTAINER-NAME
# Recreate the container
docker run -p 80:80 -d --name YOUR-CONTAINER-NAME YOUR-DOCKER-HUB-USER/YOUR-DOCKER-HUB-REPO-NAME
sudo apt-get install webhook
[
    {
      "id": "ENDPOINT-NAME",
      "execute-command": "./script.sh",
      "command-working-directory": "/etc/scripts",
      "response-message": "Executing redeploy web resume container",
      "trigger-rule":
      {
        "match":
        {
          "type": "value",
          "value": "CREATE-YOUR-OWN-TOKEN",
          "parameter":
          {
            "source": "url",
            "name": "GET-PARAM"
          }
        }
      }
    }
]
- id: Specify any name you wish, but keep in mind that it will serve as the name for the endpoint http://yourserver:9000/hooks/id
- execute-comand: Write here the name of the shell script we previously created.
- command-working-directory: To specify the working directory where the script is stored, type the path to the directory where the script is saved.
Change the value of CREATE-YOUR-OWN-TOKEN with a secure token to verify that it’s you who’s asking to redeploy the container. As well as the GET-PARAM, which can be renamed to whatever you like. Our URL will be http://yourserver:9000/hooks/id?GET-PARAM=CREATE-YOUR-OWN-TOKEN .
Just two steps remain, the first launching our endpoint ( It would be best if you run this command in the background ):
webhook -hooks web-resume.json -verbose
http://yourserver:9000/hooks/id?GET-PARAM=CREATE-YOUR-OWN-TOKEN
Buala, now when you update your GitHub web-based curriculum, push it to master and you should see the updated curriculum online in a few seconds.
Check out my web resume at joanplaja.com. In addition to the domain name, I also added SSL certificates to my website. If you don’t know how to do this I invite you to update your project to be able to do it. If you enjoyed this project please share it with your friends.